Hi, you must have had a hard time finding this article on Google or you are sneaking in from the groups I posted the link to.
To get straight to the point, this post will guide you on how to use Flux AI on ComfyUI and Workflow to play with it.
Learn the Basics of Flux AI
What is Flux AI?
FLUX.1 is a powerful and powerful text-to-image modeler from Black Forest Labs that pushes the boundaries of creativity, efficiency, and diversity. It is based on a transformer architecture and can be extended to 12 billion parameters.
FLUX.1 is very stable in creating images without requiring much knowledge or installation like MidJourney or Stable Diffusion.
To put it simply: good image creation like MidJourney, simple prompt like Dall E, highly customizable (almost but slowly) like Stable Diffusion but it’s free!
As long as you have a (powerful) computer, you can download and use it comfortably on ComfyUI.

This is a photo made with Flux on ComfyUI :3 because I couldn’t find their logo (or I’m lazy) 🙂
Who is Black Forest?
According to their self-introduction, they are a team of outstanding AI researchers and engineers with extensive experience in developing fundamental Generative AI models in academic, industrial, and open source environments.
If you’re familiar with Stable Diffusion, they’re also the ones who created Stable Diffusion, which includes: VQGAN and Latent Diffusion, Stable Diffusion models for images and videos (Stable Diffusion XL, Stable Video Diffusion, Rectified Flow Transformers), and Adversarial Diffusion Distillation for super-fast, real-time image synthesis.
In general, they are a good AI development team from Europe (I wonder what kind of ads they are running 🙂 )
Variations of FLUX.1
It basically comes in 3 main variants including 1 commercial one that is only accessible via API (can be used for commercial imaging) and 2 relatively highly customizable versions including:
- FLUX.1[pro] : The most advanced variant, offering superior performance with high-quality images and diverse outputs. For commercial applications and accessible via API, Replicate, and fal.ai.
- FLUX.1[dev] : A pro-grade model but for non-commercial applications. Achieves quality close to FLUX.1[pro] but more efficient. Available on Hugging Face, Replicate and fal.ai.
- FLUX.1[schnell] : Fastest model, suitable for local development and personal use. Available under Apache 2.0 license and integrated with ComfyUI.
In the tutorial, we will play with 2 versions, dev and schnell, because they can be downloaded for free to use comfortably.
Main Functions
It is used to create images and they are also starting to create a text to video version. Instead of boringly recounting their articles, here is my experience with its functions:
- Generate images with very high quality
- No need for lengthy prompts or tags like Stable Diffusion
- The ability to follow your prompt request is extremely high and much more accurate than other models and applications.
- Wide resolution, can create from 256 – 2048 very ok, less redundant
- Very stable limbs
In a nutshell, it beats Stable Diffusion 3 in every way except size and device requirements, but it’s worth it!
These are based on me, a person who knows nothing and tried them out. But for me, Stable Diffusion XL version is still my true love because it can create NSFW images according to my wishes 🙂 (so mean).
Basic requirements for use
Okay! Now comes the important and difficult part if you want to download it for use:
- VRam : at least 12GB, when equal or less it takes quite a while from 2 minutes to 30 minutes per 1024×1024 image.
- Graphics card: Nvidia is best, AMD is a bit difficult to set up and requires a bunch of additional stuff to install.
- Space: minimum 50GB hard drive as the model takes 24GB, CLIP 5GB and VAE adds 300MB; each 1024×1024 image generates an average of 1.2MB + ComfyUI + additional settings like Python and a bunch of other stuff if you run Windows or MacOS.
- Network: of course you should plug in a cable if possible for faster downloads.
Which model should I choose?
- Condition: If you have a powerful device, you should download the dev version to use because it has much higher quality than schnell, I’m using it on VPS.
- A little bit lacking in conditions: If you want to experience more with FLUX and ComfyUI to create better AI works and your weak machine like mine has 6GB vram, you should choose schnell. My personal experience is that it is not as good as dev so I skip it and choose to play dev.
- Quick experience for fun: simply you can go to https://fal.ai/models/fal-ai/flux-pro to use it for free, it seems to have a few photos and requires login.
In addition, I am looking for someone to share VPS slots (the version I am running is g5.4xlarge below the picture) to run TvT. I do not share for free but I will exchange with a few things like:
- AI tools, image creation, other software (Cap Cut Pro, You Pro, Perplexity, ChatGPT Plus,… things like that)
- In-depth Stable Diffusion training knowledge
- How to use VPS more optimally, especially knowledge of using Ubuntu on AWS and how to optimize multiple tasks at the same time. Because I plan to run the NVIDIA A10 Tensor Core GPU 96GB version, specifically the version below the photo or see on AWS.
More specifically you can call me through:
- Facebook: fb.com/maitruclam4real
- Mail : [email protected]
- Zalo/Viber: 0833141929
You share what you have, I share VPS, knowledge on how to use it and other resources,… As long as both sides are happy ^^.
Download and install ComfyUI
Will update later or you can refer to these videos quickly before I do:
On Windows: https://youtu.be/O5hi7H65yUc this friend’s video also guides where to put the Flux models.
On Ubuntu: https://www.youtube.com/watch?v=QnNH-Ja42pw this has easy to understand Vietnamese subtitles.
If you are a bit more advanced, go to the developer’s page and learn how to install: https://github.com/comfyanonymous/ComfyUI
On Windows
Requirements: your computer must have at least 6GB vram to run smoothly, like a 3060 card (because of my computer 🙂 )
Must be Nvidia card, AMD is not supported on Windows.
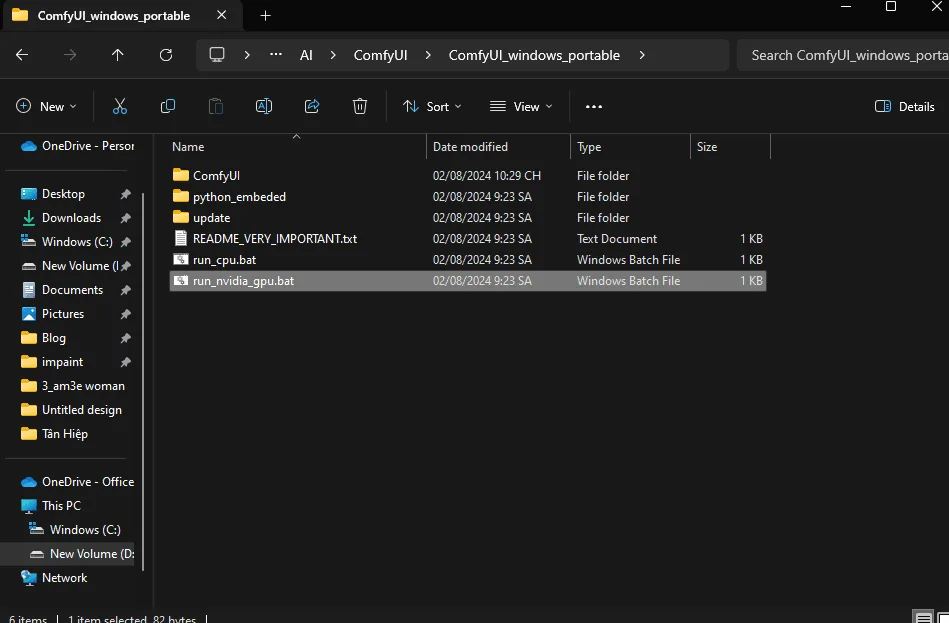
Step 1: Download this ComfyUI_windows_portable to your computer and unzip it.
Step 2: double click to run run_nvidia_gpu.bat

If you’re lucky and your computer has all the stuff installed (Python, Nvidia driver updates,…) it will run right away, otherwise it will look like this:
Step 3: Update Driver on your computer if it asks, install other things if it asks.
Step 4: after installing, pray it works fine 🙂 and run run_nvidia_gpu.bat one more time.
If it shows this then you are successful and it will automatically open the browser and its basic interface will look like this:
Step 5: Click on Queue Prompt to create the first image with your AI. Of course it will report an error like this:
Because you have not downloaded any model 🙂
To know what to download, read on.
On Ubuntu VPS
It’s basically the same as Ubuntu but without any interface 🙂
But basically you just need to follow my instructions and you’ll be fine.
Update VPS and install Python 3.10:
sudo apt update && sudo apt upgrade -y
sudo add-apt-repository ppa:deadsnakes/ppa -y
sudo apt install python3.10 -y
Download ComfyUI:
git clone https://github.com/comfyanonymous/ComfyUI
Run ComfyUI to let it create a venv environment and install things:
cd /home/ubuntu/ComfyUI/ && python3 main.py –listen
If you want to save device space, sharing models from A111 with ComfyUI would be a good idea:
ComfyUI CD
cp extra_model_paths.yaml.example extra_model_paths.yaml
nano extra_model_paths.yaml
base_path: /home/ubuntu/stable-diffusion-webui
Ctrl X
Y
Install ComfyUI Manager
To simplify the management and import and export of nodes working on ComfyUI, you can install ComfyUI Manager:
cd /home/ubuntu/ComfyUI/custom_nodes/
git clone https://github.com/ltdrdata/ComfyUI-Manager.git
How to Use Flux AI on ComfyUI
In this section, the general instructions for both Win and U are similar, because you just need enough space to download the model and use it.
The New Way: Easier to Use Flux AI Checkpoint
Download checkpoint
If you want to refer to the old way to have more experience in (bruising) you can refer to below. In this part, after a few days of bruises, I found a more stable way to use Flux AI on ComfyUI.
I originally intended to make it run on A1111 for ease of use and familiarity but it was a total failure. But that was before I tried throwing it into ComfyUI’s default interface to test it and BOOM! IT WORKED!
All you need to do is download this checkpoint: Flux 1 Checkpoint and put it in ComfyUI/models/checkpoints .
You just need to use ComfyUI’s default workflow and deploy :3
Suggested settings on ComfyUI:
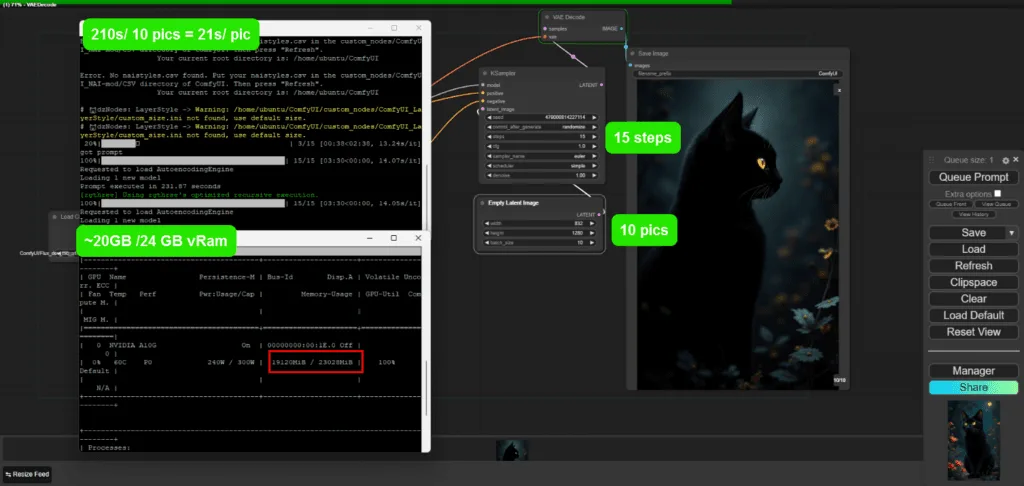
- Number of steps: 6 – 20 (15 works great)
- Sampling: eluer – simple
- CGF: 1 – 2.5 (front and back most of them are noisy or very blurry)
- Size: greater than 256 and less than 2048 (other than this they are sometimes quite odd and time consuming).
In terms of time, on VPS with configuration:
Nvidia G10 24GB vRam
64GB RAM
800GB memory
Average creation time:
1024×1024 x20steps: 31s
832×1280 x15steps: 21s
For example, I create a series of photos of size 832×1280 with 15 steps, the time is 3 minutes 30 seconds, which is 210 seconds, so about 21 seconds per photo.
Checkpoint loading time is also reduced a lot, from about 2 minutes for the first time, this one needs an average of less than 1 minute to load and start running.
A few small notes:
Negative prompt: like Stable Diffusion sometimes works, sometimes doesn’t, in my testing, keywords like: watermark, text, logo, color,… work 50/50. Some more specific things like the Disney logo can be recognized and removed (I think so because when I tested it, the logo was lost and replaced with something else or nothing).
A1111 : I tried it but it’s still a little bit or I haven’t configured it correctly so it can run, I really hope you guys try it and share it again (sincerely thank you).

Some other results:


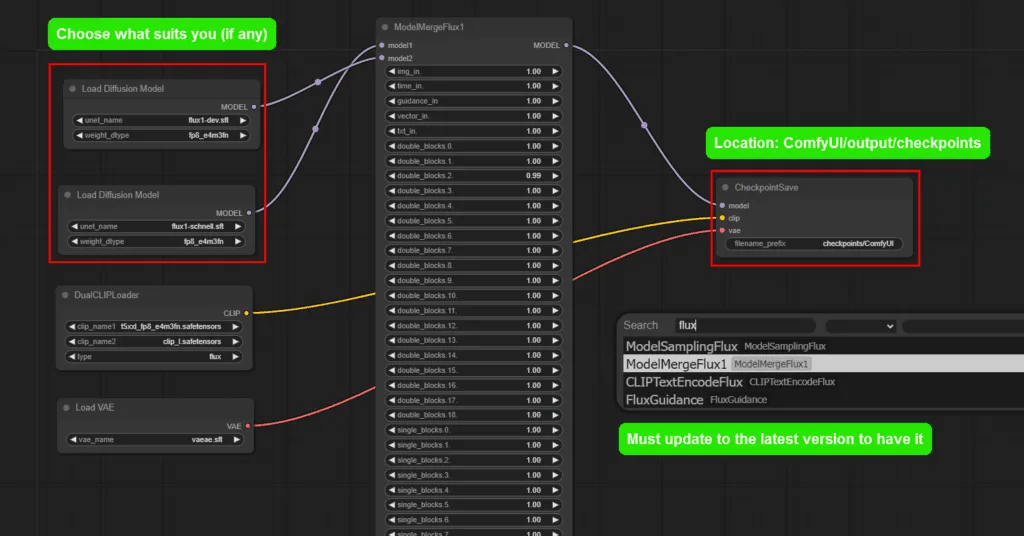
Create your own checkpoint from downloaded Flux Dev
The method is:
- Upgrade Comfy UI to the latest version , where there is a new button called ModelMergeFlux1 .
- Create a node named ModelMergeFlux1 , you choose VAE, UNET and Flux as usual like in the image below or download this workflow if you are lazy 🙂
- Click on Queue Prompt and wait for it to compile a .safetensors model: usually it will be located at: ComfyUI/output/checkpoint and named 0001.safetensors if you don’t name it.
- Download the normal workflow and start enjoying :3

A1111: I tried it but it’s still a little bit or I haven’t configured it correctly so it can run, I really hope you guys try it and share it again (sincerely thank you).
The old way: Load the necessary resources
List of required resources
The main required resources include 3 (at least 4 files in total) items only:
If you know where to put it, just download it. If not, follow the instructions below. It’s the same on Windows. The illustration is from the Ubuntu WinSCP VPS management software I’m using.
Step 1: First, go to the folder containing your ComfyUI , and select models.
Step 2: You download the models in turn into the following folders:
Step 3: Download the necessary things into the folders above:
Model
Model choose 1 of 2 or both up to you 🙂
- FLUX.1-dev: https://huggingface.co/black-forest-labs/FLUX.1-dev
- FLUX.1-schnell: https://huggingface.co/black-forest-labs/FLUX.1-schnell
If you download this Dev version, you will need to log in to huggingface to download because you have to agree to a few of their requirements before allowing the download.
After logging in, just download:
If it’s your first time using it, after agreeing, go to the Files tab, scroll down a bit to find the heaviest file named flux1-dev.safetensors and click the download button.
Download it and put it in: ComfyUI/models/unet/
VAE
VAE: only one https://huggingface.co/black-forest-labs/FLUX.1-schnell/blob/main/ae.safetensors
Download and put it here: ComfyUI/models/vae/
CLIP
You will need to download 2/3 files or all 3 specifically:
Link: https://huggingface.co/comfyanonymous/flux_text_encoders/tree/main
Need clip_l.safetensors
Need t5xxl_fp8_e4m3fn.safetensors
If your computer has more than 32GB of ram, you can download: t5xxl_fp16.safetensors instead of fp8.
Put it here: ComfyUI/models/clip/
If that’s done and everything is ok, let’s get to the usage part!
Basic usage
Download workflow
You can download the simple workflow here: https://drive.google.com/file/d/1v8xd97Qz0gB46xH7wFLsSgePPNMTkF1c/view?usp=sharing or on Civitai .
After downloading the workflow, extract it into a json file, drag it directly into the ComfyUI interface or click load and select the json file to load it into the interface as below.
Get familiar with the interface
In this section, it only summarizes the workflow of interacting with Flux:
- You will type your prompt here in English, so it gives the best results.
- Model here
- the CLIP you downloaded
- Adjust the width – height – and number of images you want to create
- Reducing the number of steps will create the image faster:
- If you are a Dev, please choose 12 – 20.
- If it is schnell 4 it is fine! Super fast, about 10 seconds and I’m there.
- It is VAE
- Finally when finished your photo will appear here.
On Windows, you can also view the image in the Outputs section.
Note:
- The bigger the image, the longer it takes.
- The more steps, the longer the time.
Also, you can try clicking on the arrows in all the nodes (those rectangular blocks) to see what happens, if anything happens just reload the old workflow.
How to write prompt
Writing prompt is simply writing whatever is on your mind, it will generate something close if it has data about those things.
You can also write super long and complicated things too!
Some pretty cool examples to try:
- A beautiful Vietnamese girl in Ao Dai white is taking a cruise in Ha Long Bay, Vietnam.
- A girl is dancing with neon lights with many people around enjoying the party.
- Superman with iron man costume
- …
Some examples of handwriting:
A pretty Asian girl holding a sign that says “TVT cable cap”
A naughty boy holding a paint can with the words “hello meow @ gmiel” on the wall
As you can see the results of the text control are very good! Not blurred or too broken like other models.
You can also try writing nonsense or writing Vietnamese, but it seems to give random but beautiful results, not like Stable Diffusion which creates weird noise images 🙁
And you can try the panda prompt, it’s weird that the data they seem to collect is related to China a lot 🙂 it will always come up with girls with double buns, Chinese characters, Chinese costumes or lanterns 🙂
Also, if you prompt as Asian or Korean, it will sometimes look like Jennie in BlackPink 🙂
In short
If you can’t install it or have an error or something, call me, I can give you free instructions or coffee or something hehehe I’m so embarrassed, I’ve already asked for money.
The video will be up soon, if you have any questions, please comment below or contact me via Facebook, Zalo, Mail or wherever I can find it.


